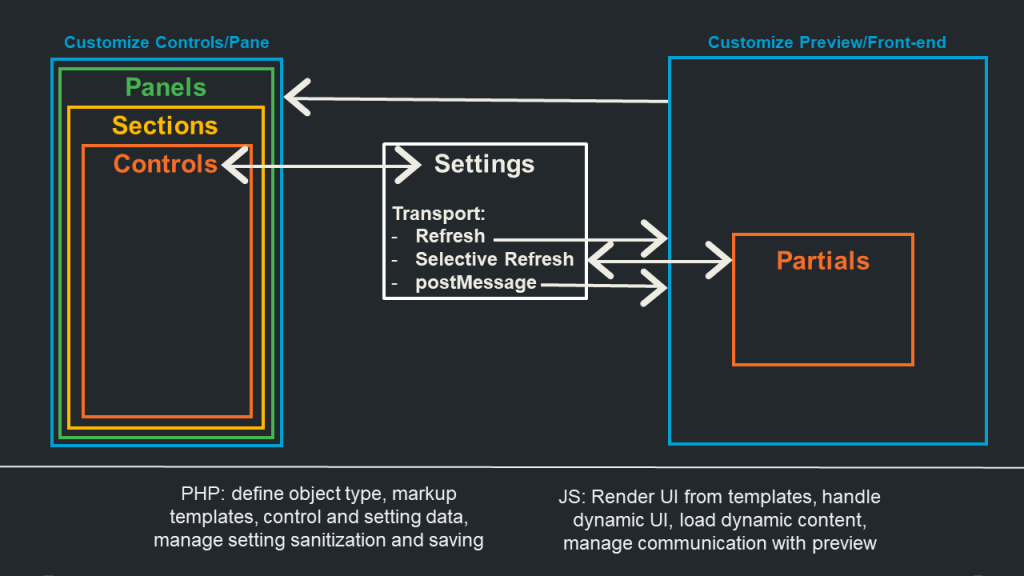
WordPress 主题自定义界面主要包含四种 Customizer 对象:
Settings(设置项)
Controls(控制器)
Sections(栏目)
Panels(面板)
它们都由 WP_Customize_Manager 进行管理。
使用 customize_register 钩子来控制任意 Customizer 对象:
1
2
3
4
5
6
7
8
9
10
11
12
13
14
15
16
17
18
19
function my_customize_register ( $wp_customize ) $wp_customize ->add_panel();$wp_customize ->get_panel();$wp_customize ->remove_panel();$wp_customize ->add_section();$wp_customize ->get_section();$wp_customize ->remove_section();$wp_customize ->add_setting();$wp_customize ->get_setting();$wp_customize ->remove_setting();$wp_customize ->add_control();$wp_customize ->get_control();$wp_customize ->remove_control();'customize_register' ,'my_customize_register' );
Settings 用来定义设置项的值(或者说是定义变量)
1
2
3
4
5
6
7
8
9
$wp_customize ->add_setting( 'setting_id' , array ('type' => 'theme_mod' , 'capability' => 'edit_theme_options' ,'theme_supports' => '' , 'default' => '' ,'transport' => 'refresh' , 'sanitize_callback' => '' ,'sanitize_js_callback' => '' ,
关于 type:
theme_mod:保存对应主题的内容,可以理解为局部变量;
option:直接保存在 wp_options 数据表中,即全局变量。
需要使用定义的值时,可以调用 get_theme_mod() 或者 get_option(),参数1为 setting 的 ID,参数2为默认值。
Controls 用来创建关联 Settings 的 UI
1
2
3
4
5
6
7
8
9
10
11
12
13
$wp_customize ->add_control( 'setting_id' , array ('type' => 'date' ,'priority' => 10 , 'section' => 'colors' , 'label' => __( 'Date' ),'description' => __( 'This is a date control with a red border.' ),'input_attrs' => array ('class' => 'my-custom-class-for-js' ,'style' => 'border: 1px solid #900' ,'placeholder' => __( 'mm/dd/yyyy' ),'active_callback' => 'is_front_page' ,
此处的 type 相当于
text/hidden/number/range……
checkbox
textarea
radio
select
dropdown-pages
section 参数必须指定对应的 Section ID,否则该 control 不会在自定义界面中展示。
input_attrs 参数通过键值对数组,映射到元素上相应的属性。
Sections 是 Controls 的 UI 容器
1
2
3
4
5
6
7
8
$wp_customize ->add_section( 'custom_css' , array ('title' => __( 'Custom CSS' ),'description' => __( 'Add custom CSS here' ),'panel' => '' , 'priority' => 160 ,'capability' => 'edit_theme_options' ,'theme_supports' => '' ,
一般定义 section 只需要定义名称和优先级即可,默认的优先级为:
Title
ID
Priority (Order)
Site Title & Tagline
title_tagline
20
Colors
colors
40
Header Image
header_image
60
Background Image
background_image
80
Menus (Panel)
nav_menus
100
Widgets (Panel)
widgets
110
Static Front Page
static_front_page
120
default 160
Additional CSS
custom_css
200
Panels 更多是作为某个完整功能的上下文,例如小部件或者菜单,并不是 Sections 的包装器(第一印象)。
Panels 的定义方式和 Sections 如出一辙:
1
2
3
4
5
$wp_customize ->add_panel( 'menus' , array ('title' => __( 'Menus' ),'description' => $description , 'priority' => 160 ,
自定义只需要通过继承 WP_Customize_XXX的子类即可:
1
2
3
4
5
6
7
8
9
10
11
class WP_New_Menu_Customize_Control extends WP_Customize_Control public $type = 'new_menu' ;public function render_content (?> <?php
对于 Controls 来说,可以直接通过通过 WP_Customize_Control 的子类来实现自定义的 Controls:
1
2
3
4
5
6
7
8
9
10
$wp_customize ->add_control( new WP_Customize_Color_Control( $wp_customize , 'color_control' , array ('label' => __( 'Accent Color' , 'theme_textdomain' ),'section' => 'media' ,$wp_customize ->add_control( new WP_Customize_Media_Control( $wp_customize , 'image_control' , array ('label' => __( 'Featured Home Page Image' , 'theme_textdomain' ),'section' => 'media' ,'mime_type' => 'image' ,
对于 Settings,可以通过定义新的 type 类型实现自定义的数据操作,对于自定义的 setting,需要绑定两个行为:
customize_update_TYPE:自定义保存功能;
customize_preview_TYPE:自定义预览功能。
Customizer 应用分为两个区域,即自定义区域和预览区域,二者可以通过 postMessage 进行信息交流。使用 JS API 除了处理预览区域的数据更新,还可以动态控制自定义区域的元素。
每一个 Customizer 的 PHP 对象都有一个与之对应的 JS 对象:
wp.customize.Control/wp.customize.control(集合)
wp.customize.Section/wp.customize.section(集合)
wp.customize.Panel/wp.customize.panel(集合)
1
2
3
wp.customize.panel.each( function ( panel ) function ( section ) function ( control )
当在 PHP 中定义一个 control:
1
2
3
4
$wp_customize ->add_control( 'blogname' , array ( 'label' => __( 'Site Title' ), 'section' => 'title_tagline' ,)
可以在 JS 中获取:
1
2
3
4
5
6
7
const controlObj = wp.customize.control('blogname' );const sectionId = controlObj.section();const sectionObj = wp.customize.section(sectionId);const panelId = sectionObj.panel();const panelObj = wp.customize.panel(panelId);
可以通过 priority 方法获取或者修改对象的优先级:
1
2
priority = wp.customize.panel( 'widgets' ).priority(); 'widgets' ).priority( 1 );
可以通过 section 和 panel 方法移动对象的位置:
1 wp.customize.control('blogname' ).section('new_section' ) ;
可以通过 activate 和 deactivate 方法显示/隐藏对象:
1
2
3
4
5
6
7
8
wp.customize.section( 'nav' ).deactivate(); 'nav' ).activate({ duration : 1000 }); 'colors' ).deactivate({ duration : 0 }); 'nav' ).deactivate({ function ('colors' ).activate();
使用 JS 模板渲染的自定义 Control 的步骤:
将子类的 render_content() 方法手动置空;
创建一个 content_template() 方法替代 render_content() 原本的内容;
使用 to_json() 方法导出自定义变量到 JS;
将 render_content() 的内容转换为 JS 模板的形式;
注册自定义的 Control 类。
1
2
3
4
5
6
7
8
9
add_action( 'customize_register' , 'prefix_customize_register' );function prefix_customize_register ( $wp_customize ) $wp_customize ->register_control_type( 'WP_Customize_Custom_Control' );
WP_Customize_Control 默认导出以下类变量:
typelabeldescriptionactive
可以通过在自定义的子类 Control 中重写 to_json() 方法来添加额外的变量:
1
2
3
4
5
public function to_json (parent ::to_json();$this ->json['statuses' ] = $this ->statuses;$this ->json['defaultValue' ] = $this ->setting->default;
做好准备后,便可以通过重写 content_template() 方法替代 render_content 的形式构建 Control 的 UI 模板。注意需要手动置空 render_content() 方法,因为需要用来覆盖默认的模板。
1
2
3
4
5
6
7
8
9
10
11
12
13
14
15
16
17
18
19
20
21
22
23
24
25
26
27
28
29
30
31
class WP_Customize_Color_Control extends WP_Customize_Control public $type = 'color' ;public function content_template (?> if ( data.defaultValue ) {if ( '#' !== data.defaultValue.substring( 0 , 1 ) ) {'#' + data.defaultValue;else {' data-default-color=' + defaultValue; <?php